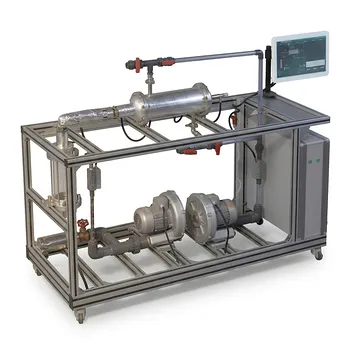
Conduction and convection are not just theoretical concepts—they are the blueprint for designing any effective fluid heating or cooling experiment in a pilot plant. Conduction governs the resistance to heat flow through the solid metal walls of pipes and tubes, dictating how you select materials, define wall thickness, and position temperature sensors. Convection determines how the fluid's bulk motion carries heat away from (or to) the wall, driving the choice of flow rate controls, pipe geometry, and measurement instrumentation. The entire experimental setup must physically separate these two mechanisms so students can quantify each heat transfer coefficient independently and then combine them into the overall heat transfer coefficient.
The core design challenge is to create a system where conduction and convection can be studied in isolation. The solution lies in building experiments that manipulate flow velocity (to vary convection) while keeping the wall's conduction path constant—enabling the classic Wilson plot method to extract heat transfer coefficients. This demands precise flow control, reconfigurable piping, and accurate temperature measurement at the wall and in the fluid.
Decoding the Roles of Conduction and Convection
To see how they shape design, first recognize the distinct physical demands each mechanism places on the hardware.
Conduction: The Wall’s Resistance
Heat must move through the solid metal tube or plate before it can reach the fluid. This path—conduction—is a fixed resistance determined by the material’s thermal conductivity and the wall thickness.
In a training system, this forces you to:
- Select tube materials with known, stable thermal conductivity (copper, stainless steel).
- Document wall thicknesses precisely, because even small errors inflate the conduction resistance calculation.
- Embed thermocouples at inner and outer wall surfaces if you intend to measure the wall temperature drop directly, or design a consistent, measurable wall geometry so that resistance can be calculated accurately.
Without a well-characterized wall, separating conduction from convection is impossible. You are left with a lumped “overall” value that hides the fundamental physics.
Convection: The Fluid’s Dance
Once heat crosses the wall, convection takes over. The moving fluid sweeps the heat away or brings it in, with a coefficient that depends on velocity, fluid properties, and channel geometry.
For the experiment, this means you must:
- Install flow meters and control valves to precisely set and vary the flow rate on both hot and cold sides.
- Design the piping layout to allow different flow regimes (laminar, transitional, turbulent) and to demonstrate the impact of Reynolds and Prandtl numbers.
- Provide flexible flow arrangements—series, parallel, or multi-pass—because the same flow rate yields dramatically different heat transfer coefficients and temperature correction factors depending on how the fluid moves through the exchanger.
Convection’s dependence on geometry and flow is why training systems that lock users into a single, fixed hydraulic path teach only a fraction of the lesson.
Designing Experiments to Isolate Each Mechanism
The pedagogical goal is to turn the system into a learning tool where students can disentangle conduction from convection. Two design features are essential.
The Wilson Plot Technique
A Wilson plot is the gold-standard method for separating the wall’s conduction resistance from the fluid’s convection resistance. In an experiment, you maintain constant temperature conditions but vary the flow rate on one side over a wide range. The overall heat transfer coefficient (U) is measured for each run.
The logic is simple: the conduction resistance stays fixed while the convection resistance changes with velocity according to (h \propto \text{Re}^n). By plotting (1/U) against (1/\text{Re}^n) (or a similar appropriate function), the intercept yields the wall resistance—pure conduction—and the slope gives the convection coefficient.
To enable this, the training system must:
- Offer independent, finely adjustable flow control on at least one fluid loop.
- Include sensors to log bulk fluid temperatures at inlets/outlets and, optionally, wall temperatures to verify the extracted resistance.
- Have a heating/cooling source that can deliver a stable fluid temperature, isolating the test side.
Flexible Flow Arrangements for Convection Studies
Flow arrangement directly influences convection’s effectiveness and the correction factor applied to the log mean temperature difference. In a training system, reconfigurability is crucial:
- Series flow pushes fluid through channels one after another, increasing velocity and raising the convection coefficient, but at the cost of higher pressure drop.
- Parallel flow splits the stream, lowering velocity and the coefficient while reducing pumping demand.
- Multi-pass configurations introduce cross-current or combined flows, bringing in the temperature correction factor (F_t), which depends on the Number of Transfer Units (NTU) and the flow configuration.
Without the ability to switch between series and parallel paths, students cannot observe how convection coefficients and the log mean temperature difference correction shift with hydraulic design—a key real-world design trade-off.
Understanding the Trade-offs
No design satisfies every goal equally. You must balance teaching depth against system complexity.
Simplicity vs. Realism
A transparent, single-tube heat exchanger with constant wall thickness and exposed thermocouple ports makes conduction easy to see. But it may lack the industrial realism of a multi-pass plate exchanger. Conversely, a fully automated industrial pilot unit can obscure the basic mechanisms behind layers of software.
For foundational training, prioritize clarity—a system where flow rates can be varied manually, and the Wilson plot can be performed with a simple data-logging interface. As students advance, add complexity like variable flow arrangements or more sophisticated sensors.
Cost and Safety Constraints
Adding wall-embedded thermocouples, precision flow meters, or reconfigurable piping increases capital cost. High-temperature circuits demand insulation, pressure relief, and robust materials—all of which can distract from the core lesson. A well-designed training skid focuses investment on the components that directly teach the separation of conduction and convection, not on extraneous automation.
Making the Right Choice for Your Training Goals
Every fluid heating and cooling experiment design is a decision about which mechanism to illuminate. Use these goal-driven guidelines:
- If your primary focus is teaching the basic resistance concept: Choose a simple, well-instrumented double-pipe exchanger with known wall thickness and material. Ensure flow rates can be varied over a wide Reynolds number range, and embed at least a few wall thermocouples to directly show the conduction gradient.
- If your primary focus is demonstrating the Wilson plot method: Design a rig where one fluid loop’s flow rate can be precisely stepped through multiple setpoints while the other side’s conditions remain stable. Log all temperatures and flow data automatically to streamline the graphical analysis.
- If your primary focus is industrial configuration effects: Build reconfigurable piping that allows series, parallel, and multi-pass flow arrangements. Let students measure the temperature correction factor (F_t) and see how it deviates from unity as the number of transfer units changes—this is the lesson on convection coupled with exchanger geometry.
A training system that clearly isolates conduction and convection transforms abstract equations into tangible, measurable phenomena. Design with that separation in mind, and your experiments will produce engineers who truly grasp how heat moves from a metal wall to a flowing fluid.
Summary Table:
| Heat Transfer Mechanism | Key Influence on Experiment Design | Hardware & Instrumentation Requirements |
|---|---|---|
| Conduction | Governs resistance through solid tube/plate walls; determines material selection. | Precision-documented wall thickness, stable thermal conductivity metals (copper/stainless steel), embedded wall thermocouples. |
| Convection | Dictates heat transfer via fluid motion; determines flow rates and boundary layers. | Flow meters, control valves, and reconfigurable piping layouts (series, parallel, or multi-pass). |
Elevate Your Engineering Lab with LABPARK
Looking to bridge the gap between heat transfer theory and hands-on practice? LABPARK provides state-of-the-art Educational and Vocational Unit Operations Pilot Plants in chemical engineering, bioprocess & biotech, and environmental & water treatment.
Designed specifically for universities, research institutes, and enterprises, our systems offer the flexible configurations, precise flow control, and durable instrumentation needed to isolate conduction and convection effortlessly.
Maximize your training efficiency and prepare the next generation of engineers—contact us today to custom-design your laboratory pilot plants!
Related Products
- Two-Dimensional Fluidization Hydrodynamics Educational Pilot Plant for Unit Operations Training
- Multi Pump Fluid Transport Process Piping Unit Operations Training Pilot Plant
- Fluid Transport and Piping Dynamics Practical Training Unit Operations Pilot Plant
- Multi-Reactor Educational Pilot Plant for Reaction Engineering Unit Operations
- Comprehensive Multi-Modal Heat Transfer Unit Operations Pilot Plant for Engineering Training
People Also Ask
- What pressure drop characteristics should students & researchers monitor in a fluidization pilot plant?
- How does active time pulsing mixing enhance fluid homogenization? Configuration Guide for Educational Pilot Plants
- How can acoustic chemometrics prevent reactor clogging in educational fluidized bed pilot plants?
- What is the operational significance of solids feed rate on emulsion phase dynamics in fluidized bed pilot plants?
- Why is UB/Ui critical in fluidized bed pilot plant modeling? Master Gas-Solid Contact